Outdoor Kitchen Gazebo: Hardtop Styles, Sizing, Wind Ratings & Top Brands for 2026
Outdoor kitchen gazebo kits assemble in a weekend with hardtop or polycarbonate roofs rated for 50 to 80 mph winds. Compare Yardistry, Sojag, and Purple Leaf.
Outdoor Kitchen Setup Editorial Team
Outdoor living specialists with 15+ years of hands-on experience
Top Picks: Best Outdoor Kitchen Gazebo: Hardtop Styles, Sizing, Wind Ratings & Top Brands for 2026 in 2026
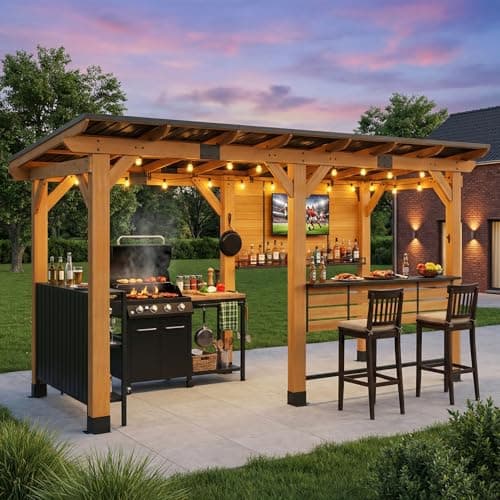
CHARMELEON 6 x 14 FT Grill Gazebo with Storage Cabinet,Cedar Wood Entertainment Bar Center Including Metal TV Mount&Serving Bar&Paper Towel Holder&Bottle Opener,Wooden Gazebo for Patio,Garden,Outdoor
$1,199.99
Shop Now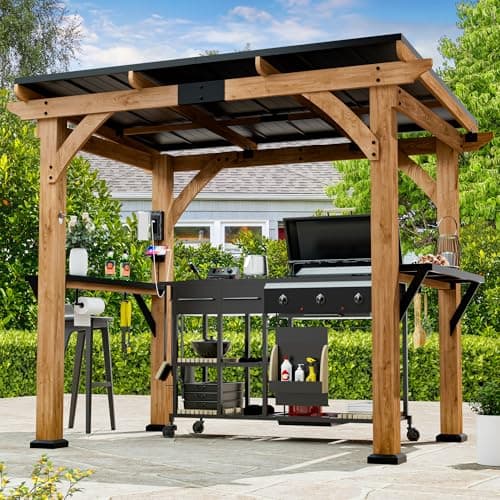
Modern Shade Grill Gazebo 6' X 8', Cedar Wood Gazebo with Shelves and Paper Towel Holder, Outdoor Bar with Galvanized Steel Roof, USB and USB-C Charging Ports, Outdoor Patio Bars for Backyard
$599.99
Shop Now
ALAULM 10'x 10' Hardtop Grill Gazebo, Outdoor BBQ Gazebo with Storage Shelves and Expansion Platform, Permanent Galvanized Steel Lean to Canopy with Grey-Black Metal Privacy Screen for Patio
$599.99
Shop Now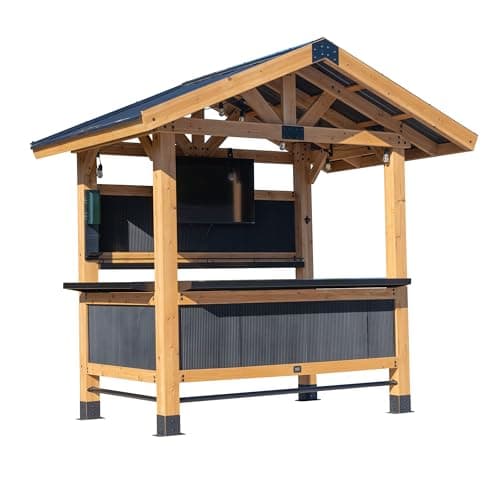
Backyard Discovery Palisade 9' x 6' Cedar Wood Outdoor Bar Set with Galvanized Steel Roof, Bar Top, Shelving, Snow Load Support, Wind Resistance, PowerPort for Patio, Deck, Entertaining
$1,999.00
Shop Now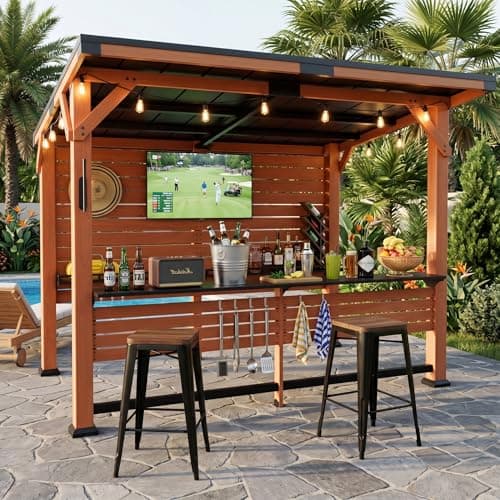
10' x 8' Premium Outdoor Entertainment Bar Center, 26 Gauge Galvanized Steel Roof, Heavy-Duty Solid Wood Pillar,Warm Cedar Wooden Gazebo with Bar Top, TV Mount, Shelves and Hooks for Patio, Deck
$899.85
Shop Now
AECOJOY 6' x 6' Outdoor Hardtop Grill Gazebo, Small Pergolas and Gazebos Clearance, Lean to BBQ Gazebo for Outdoor Grill, Metal Awnings for Patio and Decks
$199.99
Shop Now
Aoxun 8’x 5’ Premium Gazebo with Aluminum Top Frame & Polycarbonate Panel, Wall Mounted Gazebos Pergola, Outdoor Patio Lean to Gazebo, Awnings with Sloped Roof, for Backyard, Porch, Deck
$189.98
Shop Now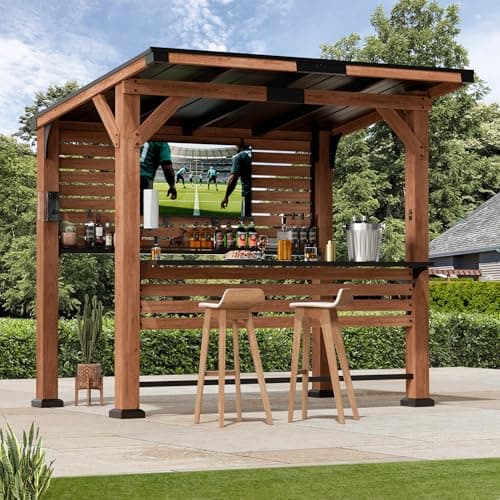
Modern Shade The Aura Cedar Wood Entertainment Bar Center, Wood Gazebo Grill Pavilion with Shelves & Paper Towel Holder, Grill Gazebo with Hardtop Steel Roof,TV Mount, Power Strip for Patio, Garden
$797.99
Shop NowCHARMELEON 6 x 14 FT Grill Gazebo with Storage Cabinet,Cedar Wood Entertainment Bar Center Including Metal TV Mount&Serving Bar&Paper Towel Holder&Bottle Opener,Wooden Gazebo for Patio,Garden,Outdoor
$1,199.99
Shop NowModern Shade Grill Gazebo 6' X 8', Cedar Wood Gazebo with Shelves and Paper Towel Holder, Outdoor Bar with Galvanized Steel Roof, USB and USB-C Charging Ports, Outdoor Patio Bars for Backyard
$599.99
Shop NowALAULM 10'x 10' Hardtop Grill Gazebo, Outdoor BBQ Gazebo with Storage Shelves and Expansion Platform, Permanent Galvanized Steel Lean to Canopy with Grey-Black Metal Privacy Screen for Patio
$599.99
Shop NowBackyard Discovery Palisade 9' x 6' Cedar Wood Outdoor Bar Set with Galvanized Steel Roof, Bar Top, Shelving, Snow Load Support, Wind Resistance, PowerPort for Patio, Deck, Entertaining
$1,999.00
Shop Now10' x 8' Premium Outdoor Entertainment Bar Center, 26 Gauge Galvanized Steel Roof, Heavy-Duty Solid Wood Pillar,Warm Cedar Wooden Gazebo with Bar Top, TV Mount, Shelves and Hooks for Patio, Deck
$899.85
Shop NowAECOJOY 6' x 6' Outdoor Hardtop Grill Gazebo, Small Pergolas and Gazebos Clearance, Lean to BBQ Gazebo for Outdoor Grill, Metal Awnings for Patio and Decks
$199.99
Shop NowAoxun 8’x 5’ Premium Gazebo with Aluminum Top Frame & Polycarbonate Panel, Wall Mounted Gazebos Pergola, Outdoor Patio Lean to Gazebo, Awnings with Sloped Roof, for Backyard, Porch, Deck
$189.98
Shop NowModern Shade The Aura Cedar Wood Entertainment Bar Center, Wood Gazebo Grill Pavilion with Shelves & Paper Towel Holder, Grill Gazebo with Hardtop Steel Roof,TV Mount, Power Strip for Patio, Garden
$797.99
Shop NowHardtop vs Soft-Top Gazebos: Which Is Right for an Outdoor Kitchen?
The first and most consequential decision when selecting an outdoor kitchen gazebo is whether to choose a hardtop (rigid roof panels) or a soft-top (fabric canopy) design. For outdoor kitchen applications specifically, hardtop gazebos are almost universally the better choice — and understanding why will save you from a costly mistake that many homeowners make by opting for a cheaper soft-top that cannot handle the demands of a cooking environment.
Hardtop gazebos use rigid roof panels made from galvanized steel, aluminum, polycarbonate, or a combination of these materials. They provide complete rain protection with zero sag, shed snow loads effectively, resist wind uplift forces, and tolerate the heat and grease vapor generated by grills and smokers without deterioration. A hardtop roof also supports the installation of ceiling fans, pendant lights, and hooks for hanging planters or utensils — features that transform the gazebo into a genuine outdoor room. The rigid structure maintains its shape across seasons without the sagging, flapping, and UV deterioration that plagues fabric canopies. Hardtop gazebos for outdoor kitchen use typically cost $2,500 to $6,000 and carry structural warranties of 5 to 15 years.
Soft-top gazebos use a fabric canopy — typically polyester or olefin — stretched over a metal frame. They cost 30 to 60 percent less than hardtop equivalents and are lighter and easier to assemble. However, soft-top gazebos have critical limitations for outdoor kitchen use. Fabric canopies absorb grease vapor from cooking, creating permanent stains and attracting mildew within one to two seasons. They collect water during rain, forming heavy pools that stress the frame and drip onto the cooking area. Fabric degrades under UV exposure, requiring canopy replacement every two to four years at $150 to $400 per replacement. Most importantly, soft-top gazebos are not rated for snow loads — a single heavy snowfall can collapse the canopy and damage the frame. If you must use a soft-top gazebo, restrict it to a dining area away from the grill and use a dedicated hardtop structure or range hood over the cooking zone itself. For deeper context on how this connects to a larger build, our main outdoor kitchen setup guide covers every related topic in detail.
Ventilated Double-Roof Gazebos: Essential for Grills and Smokers
A ventilated double-roof design is arguably the single most important feature to look for in an outdoor kitchen gazebo. Standard single-roof gazebos trap smoke, heat, and combustion gases beneath the canopy, creating an uncomfortable and potentially hazardous cooking environment — especially when operating high-BTU gas grills, charcoal grills, or smokers that produce heavy, sustained smoke output. A double-roof (also called a two-tier or vented-crown) gazebo solves this problem elegantly with a structural gap between the lower main roof and a raised upper cap that allows hot air and smoke to escape through natural convection while still blocking rain and direct sun.
The ventilated crown works on a simple thermodynamic principle: hot air generated by the grill rises to the peak of the lower roof, then passes through the gap between the two roof tiers and exits laterally through the open sides of the upper crown. Meanwhile, rain enters the gap at a steep angle and drains off the lower roof panels rather than falling through to the cooking area below. In practice, a well-designed double-roof gazebo vents 80 to 90 percent of grill smoke within seconds, compared to a single-roof structure where smoke lingers for minutes and coats every surface with greasy residue.
Not all double-roof designs are equally effective. Look for a crown gap of at least 6 to 10 inches between the lower and upper roof sections — narrower gaps restrict airflow and reduce ventilation efficiency. The upper crown should be open on all four sides, not partially enclosed with decorative panels that block cross-ventilation. Some premium models like the Sojag Messina and Yardistry Meridian feature mosquito netting that can be drawn across the gap to keep insects out while maintaining airflow — a thoughtful detail for evening cooking sessions when bugs are most active.
If your outdoor kitchen involves heavy smoking — operating a pellet smoker, offset smoker, or kamado-style grill for multi-hour low-and-slow sessions — consider pairing the ventilated gazebo with a portable outdoor fan positioned to direct airflow upward through the crown. This active-assist approach prevents smoke from settling at head height during calm-wind conditions when natural convection alone may be insufficient.
Sizing Your Gazebo for an Outdoor Kitchen Island and Dining Area
Choosing the right gazebo size for your outdoor kitchen requires careful measurement of your kitchen island footprint, planned dining or seating area, and the clearance space needed around both for comfortable movement and safe cooking. An undersized gazebo leaves parts of your kitchen exposed to weather, while an oversized one wastes budget and may overwhelm the proportions of your backyard. Here is how to calculate the correct size.
Step 1: Measure your kitchen island. A standard outdoor kitchen island is 6 to 10 feet long and 2.5 to 3.5 feet deep. An L-shaped island may extend 8 to 12 feet on the long side and 4 to 6 feet on the return. Record the total footprint including any countertop overhang for bar seating.
Step 2: Add clearance around the island. Building codes and practical usability require a minimum of 36 inches (3 feet) of clear space behind the cook's position and 42 inches on sides where people walk. For bar-height seating, allow 24 to 30 inches of stool depth plus 18 inches of walkway behind the stools. These clearances add approximately 3 to 5 feet to each dimension of the island footprint.
Step 3: Include dining space if desired. If your gazebo will also shelter a dining table, a 4-person rectangular table requires a zone approximately 5 by 3 feet, and a 6-person table needs about 6 by 3.5 feet. Add 36 inches of chair-pullback space on all sides of the table.
Based on these calculations, here are the most common gazebo sizes for outdoor kitchen applications:
- 10 x 12 feet: Accommodates a straight island up to 7 feet long with adequate clearance on three sides. No room for a separate dining table. Suitable for compact grilling stations.
- 12 x 14 feet: The most popular size for outdoor kitchens. Fits an island up to 8 feet long plus a small 4-person dining area or generous clearance on all sides. This is the sweet spot for most residential setups.
- 12 x 16 feet or larger: Required for L-shaped islands, islands exceeding 8 feet in length, or configurations that include both a cooking island and a 6-person dining table. Premium gazebos in this size range from Yardistry and Paragon Outdoor provide the space of a small room.
Wind Ratings and Structural Anchoring for Outdoor Kitchen Gazebos
Wind is the most significant structural threat to outdoor kitchen gazebos, and selecting a model with adequate wind ratings for your region — then anchoring it properly — is essential for both safety and investment protection. A gazebo that lifts off its footings during a windstorm becomes a dangerous projectile that can damage your home, your neighbor's property, and anyone nearby. Insurance claims for gazebo wind damage are common, and many policies require proof of proper anchoring for coverage.
Gazebo wind ratings represent the maximum sustained wind speed the structure can withstand when properly anchored to the specified foundation type. Most residential hardtop gazebos are rated in one of three tiers:
- Standard duty: 45 to 55 mph. Adequate for sheltered locations in moderate-wind regions (Midwest, Pacific Northwest, inland areas). Most budget hardtop gazebos from brands like Kozyard and Purple Leaf fall in this range.
- Heavy duty: 55 to 75 mph. Suitable for exposed locations in moderate-wind regions and sheltered locations in high-wind zones. Mid-range and premium gazebos from Sojag and Yardistry typically meet this standard.
- Hurricane rated: 100+ mph. Required for coastal hurricane zones. Few prefabricated gazebos achieve this rating — most homeowners in hurricane zones need custom-engineered structures or bolt-down pavilion kits from manufacturers like Paragon Outdoor that are specifically engineered for extreme wind loads.
Anchoring methods determine whether the gazebo achieves its rated wind resistance. The three common anchoring approaches are:
Concrete anchor bolts are the gold standard. Drill into an existing concrete slab or pour dedicated concrete footings, then bolt the gazebo's base plates directly to the concrete using 3/8-inch or 1/2-inch wedge anchors. This method provides the highest pullout resistance — typically 2,000 to 4,000 pounds per anchor — and is required to achieve the manufacturer's stated wind rating.
Ground auger anchors (helical earth anchors) screw into the soil 24 to 36 inches deep and attach to the gazebo legs with brackets or cables. These are effective in dense clay or compacted soil, providing 500 to 1,500 pounds of pullout resistance per anchor depending on soil type. They are the best option when no concrete slab exists and you want to avoid pouring footings.
Weight-based anchoring uses sandbags, concrete blocks, or water-filled weights attached to the gazebo legs. This method provides the weakest hold — typically 100 to 300 pounds per leg — and is only suitable for temporary installations in low-wind areas. It should not be relied upon for permanent outdoor kitchen gazebo installations.
Top Outdoor Kitchen Gazebo Brands: Yardistry, Sojag, Kozyard, and More
The outdoor gazebo market has grown rapidly, and several brands have emerged as leaders for outdoor kitchen applications. Each brand occupies a distinct position in terms of price, materials, design aesthetics, and structural capability. Here is a detailed comparison of the top options available in 2026.
Yardistry is the premium wood-and-metal hybrid gazebo brand, known for using FSC-certified cedar posts and beams with powder-coated aluminum or galvanized steel roof panels. The Yardistry Meridian (12 x 14 feet) and Carolina Pavilion (12 x 16 feet) are the most popular models for outdoor kitchens, featuring cedar construction that adds natural warmth and can be stained to match any outdoor design palette. Yardistry gazebos are sold at Costco and specialty retailers for $3,000 to $5,500 and include ventilated double-roof designs. The cedar posts are naturally rot-resistant but benefit from a penetrating stain every two to three years. Assembly typically requires two people and one to two days.
Sojag (a Canadian manufacturer) produces all-aluminum hardtop gazebos that excel in wet and humid climates where wood would rot and steel would rust. The Sojag Messina (10 x 12 and 12 x 16 feet), Mykonos, and Genova models feature powder-coated aluminum frames with galvanized steel roof panels and integrated mosquito netting. Sojag gazebos cost $1,800 to $4,500 depending on size and model. Their all-metal construction is lighter than wood-hybrid designs, making assembly easier, but the aesthetic is more industrial-modern than the warm, traditional look of Yardistry's cedar.
Kozyard occupies the budget-friendly segment with hardtop gazebos priced from $1,200 to $2,800. The Kozyard Alexander (10 x 12 feet) is one of the best-selling outdoor kitchen gazebos on Amazon, featuring a double-vented galvanized steel roof on an aluminum frame with curtains and mosquito netting included. Kozyard products offer excellent value but use thinner frame profiles (typically 1.5-inch posts versus 2-inch on premium brands), which reduces wind resistance and overall rigidity.
Purple Leaf has gained significant market share with oversized hardtop gazebos in the 10-by-13 and 12-by-16-foot range, often priced 20 to 30 percent below Sojag for comparable sizes. Purple Leaf models feature galvanized steel double-vented roofs and aluminum frames with a distinctive curved-beam design. Pricing runs $1,500 to $3,500. Quality is competitive with Kozyard and the larger sizing options make Purple Leaf attractive for outdoor kitchens that need extra coverage.
Paragon Outdoor targets the premium segment with heavy-duty aluminum-frame gazebos engineered for higher wind loads and commercial applications. The Paragon Santa Monica, Durham, and Seville models are built with thicker aluminum extrusions and come with structural engineering documentation for permit applications. Prices range from $3,500 to $7,000, and these gazebos are the best prefabricated choice for homeowners in high-wind zones who need documented structural ratings.
Assembly Tips and Common Mistakes When Installing an Outdoor Kitchen Gazebo
Assembling a prefabricated outdoor kitchen gazebo is a manageable DIY project for most homeowners, but the process involves hundreds of components, precise alignment requirements, and several steps where mistakes are costly to reverse. Learning from the most common assembly errors before you start saves hours of frustration and prevents structural problems that compromise safety and warranty coverage.
Prepare the site before delivery. The gazebo needs a perfectly level surface — a variance of more than 1/4 inch across any 10-foot span will cause posts to be out of plumb, roof panels to misalign, and doors or curtain tracks to bind. If installing on an existing concrete patio, check for level with a 4-foot spirit level and shim the base plates as needed. If installing on a new surface, pour a concrete slab at least 4 inches thick with a broom finish for traction, or lay interlocking concrete pavers over a compacted gravel base with a 1/4-inch-per-foot drainage slope away from the kitchen island.
Read the entire manual before opening a single hardware bag. This sounds obvious but is the most commonly skipped step. Gazebo kits contain 200 to 500 individual parts spread across multiple boxes, and the assembly sequence matters — installing components out of order often requires partial disassembly to correct. Sort all hardware into labeled containers before starting, and verify that every piece listed in the parts manifest is present. Contact the manufacturer for replacements before assembly day if anything is missing.
Use a minimum of two people, ideally three. Roof panels on a 12-by-14-foot gazebo can weigh 30 to 50 pounds each and must be lifted overhead and held in position while being fastened. This is physically impossible for one person and dangerous to attempt on a ladder without a second person stabilizing the panel. A third person to hand up hardware and tools makes the process significantly faster and safer.
Common mistakes to avoid:
- Not pre-drilling pilot holes in cedar posts: Cedar is soft enough that screws can be driven without pre-drilling, but the wood often splits when lag bolts or heavy fasteners are installed without pilot holes. Drill a pilot hole 1/16 inch smaller than the fastener diameter for every structural connection.
- Over-tightening roof panel screws: Steel and polycarbonate roof panels expand and contract with temperature changes. Over-tightened screws prevent this movement, causing panels to buckle, screws to loosen, or panels to crack at the fastener point. Tighten until snug with the gasket compressed, then stop.
- Skipping the anchoring step: Many homeowners finish assembly and skip the permanent anchoring, planning to do it later. This is a critical safety lapse. A single wind event can lift an unanchored gazebo off the ground, destroying it and potentially injuring people. Anchor the structure to its foundation before using it for the first time.
Customizing Your Outdoor Kitchen Gazebo: Lighting, Fans, Curtains, and Upgrades
A stock gazebo provides the structural shell for your outdoor kitchen, but thoughtful customization transforms it into a fully functional and visually stunning outdoor living space. The best gazebo upgrades improve comfort, extend usability into evening hours and shoulder seasons, and protect against insects and wind-driven rain — all while adding minimal additional cost relative to the total project investment.
Lighting is the highest-impact upgrade because it extends gazebo usability from daylight hours into the evening, when most outdoor entertaining actually occurs. The most practical lighting approach combines task lights over the cooking area with ambient lights for the overall space. Install a waterproof LED strip light (IP65-rated or higher) along the underside of the roof beams directly above the grill and prep areas for bright, shadow-free task illumination. Add warm-white string lights (2700K color temperature) draped in a zigzag pattern across the ceiling for ambient glow. For a more permanent solution, outdoor-rated pendant lights or a hardwired LED chandelier can be mounted to the gazebo's ridge beam. Run all wiring through weatherproof conduit attached to the gazebo frame, and connect to a GFCI-protected circuit.
Ceiling fans dramatically improve comfort by circulating air in the covered space, reducing perceived temperature by 4 to 8 degrees Fahrenheit and helping to move smoke away from the cook's face. Outdoor-rated ceiling fans (UL listed for damp or wet locations) from brands like Hunter, Fanimation, and Minka-Aire are designed for covered but open-air environments. Choose a fan with a 52 to 60-inch blade span for a 10-by-12-foot gazebo and a 60 to 72-inch span for a 12-by-16-foot structure. Mount the fan at the center of the gazebo's ceiling, ensuring at least 7 feet of clearance between the fan blades and the finished floor.
Curtains and screens close off the gazebo's open sides for privacy, wind blocking, and insect protection. Most hardtop gazebos from Sojag, Kozyard, and Purple Leaf include mosquito netting as a standard accessory. For more substantial wind and rain protection, add outdoor curtain panels made from Sunbrella or similar solution-dyed acrylic fabric. Install a stainless steel curtain rod or cable wire system along each side of the gazebo, and use grommet-top curtains that slide easily for opening and closing. This setup costs $200 to $600 per side depending on fabric quality and allows you to create a fully enclosed space during storms or cool evenings while opening up completely on pleasant days.
Heating elements extend the outdoor kitchen season into fall and early spring. Wall-mounted or ceiling-mounted electric infrared heaters from brands like Infratech and Bromic install easily under the gazebo roof and provide instant radiant warmth without open flames or combustion byproducts. A single 3,000-watt heater covers approximately 100 square feet and costs $500 to $1,500 installed. For larger gazebos, two heaters positioned on opposite sides provide even coverage.
Gazebo Maintenance, Seasonal Care, and Long-Term Durability
A well-maintained outdoor kitchen gazebo delivers 15 to 25 years of reliable service, while a neglected one can develop structural problems, roof leaks, and cosmetic deterioration within just five to seven years. The good news is that hardtop gazebos require far less maintenance than pergolas or open-wood structures — but they are not zero-maintenance. Establishing a simple seasonal care routine keeps your gazebo looking great and structurally sound for the long haul.
Roof panel care is the most important maintenance task. Galvanized steel and aluminum roof panels should be rinsed with a garden hose quarterly to remove pollen, tree sap, bird droppings, and airborne grime that can cause surface staining or coating degradation. For stubborn deposits, use a soft-bristle brush with mild dish soap and water — never use abrasive cleaners, steel wool, or pressure washers on metal roof panels, as these damage the powder-coated or painted finish that protects the underlying metal from corrosion. Polycarbonate roof panels require the same gentle cleaning approach but are more susceptible to scratching, so use only microfiber cloths or soft sponges. Inspect all roof panel fasteners twice per year — once in spring and once in fall — and tighten any screws that have loosened due to thermal expansion cycling.
Frame inspection and hardware tightening should be performed at the beginning of each outdoor season. Walk around the gazebo and check every visible bolt, screw, and bracket for tightness. Thermal expansion from summer heat followed by winter contraction causes hardware to loosen gradually over time, and a single loose connection can create a cascading structural weakness under wind load. Pay special attention to the roof-to-post connections and the base plate anchor bolts, as these are the highest-stress points in the structure. For cedar-frame gazebos like Yardistry models, inspect wood posts and beams for checking (surface cracks), splitting, and signs of rot at the base where the wood contacts the mounting hardware. Apply a penetrating wood sealer or stain every two to three years to maintain moisture resistance and UV protection.
Seasonal preparation varies by climate. In snow zones, clear heavy snow accumulations from the gazebo roof promptly — most residential hardtop gazebos are rated for snow loads of 15 to 25 pounds per square foot, but a wet, heavy snowfall can exceed this threshold quickly. Use a roof rake or soft push broom from the ground rather than climbing on the structure. Before winter, remove any fabric curtains, netting, and cushions and store them indoors. In hurricane or storm zones, remove any detachable accessories before an approaching severe weather event and verify that all anchor bolts are secure. At the start of spring, perform a comprehensive inspection of all components, clean all surfaces, lubricate any moving hardware such as curtain tracks with silicone spray, and replace any damaged netting or curtain panels before the outdoor season begins.
Frequently Asked Questions
01What size gazebo do I need for an outdoor kitchen?
02Are hardtop gazebos worth it for outdoor kitchens?
03What is a ventilated double-roof gazebo and why does it matter?
04Which is better for an outdoor kitchen: Yardistry or Sojag gazebo?
05How do I anchor a gazebo for outdoor kitchen use?
06Can I put a grill under a gazebo safely?
07How long does it take to assemble a hardtop gazebo?
08Do I need a permit for a gazebo over my outdoor kitchen?
09What wind rating should an outdoor kitchen gazebo have?
10Can I add electricity to a gazebo for lights and fans?
Related Guides
Outdoor Kitchen Pergola: Styles, Materials & Installation Guide
Read guide →
GuideOutdoor Kitchen Roof: Permanent Roofing Options & Ventilation
Read guide →
GuideCovered Outdoor Kitchen Ideas: Pergolas, Pavilions & Roof Designs
Read guide →
GuideOutdoor Kitchen Cover: Weatherproof Protection Guide
Read guide →
GuideOutdoor Kitchen Islands: Prefab vs Custom & Sizing Guide
Read guide →
GuideOutdoor Kitchen Lighting: Task, Ambient & Weatherproof Fixtures
Read guide →