Outdoor Kitchen Sink: Types, Materials, and Installation Guide for 2026
Outdoor kitchen sink installation guide covering plumbing supply lines, freeze-proof drain layouts, T-304 stainless basins,
Outdoor Kitchen Setup Editorial Team
Outdoor living specialists with 15+ years of hands-on experience
An outdoor kitchen sink is one of the most practical additions you can make to your backyard cooking station, yet it is also one of the most frequently overlooked components during the planning stage. Having running water just steps from your grill eliminates countless trips inside to wash hands, rinse vegetables, clean utensils, or fill pots. In fact, experienced outdoor kitchen owners consistently rank the sink as the single feature they wish they had included from the beginning. The outdoor kitchen sink market in 2026 offers a wide range of options, from compact 15-inch bar sinks ideal for small islands to full-sized 33-inch workstation sinks with integrated cutting boards and colanders. Materials include 16-gauge and 18-gauge stainless steel, granite composite, fireclay, and even copper, with prices spanning from $80 for a basic drop-in bar sink to $800 or more for a premium undermount workstation model. Beyond the sink itself, you need to plan for water supply lines, drainage, a faucet rated for outdoor use, and potentially a hot water source. This guide covers every aspect of choosing and installing an outdoor kitchen sink, including the differences between drop-in and undermount mounting styles, material comparisons with real-world durability data, plumbing requirements and costs, drainage solutions for various patio types, and our top product recommendations from brands like Ruvati, Kraus, Blanco, and Elkay. Whether you are building a new outdoor kitchen or retrofitting a sink into an existing island, this is your complete resource.
Top Picks: Best Outdoor Kitchen Sink: Types, Materials, and Installation Guide for 2026 in 2026
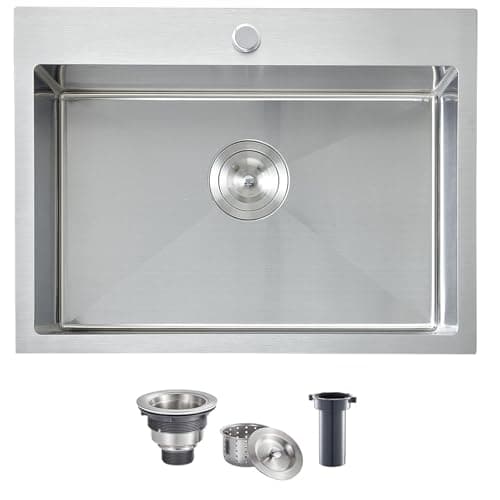
VCCUCINE 22x18 Inch Drop in Kitchen Sink,16 Gauge Topmount RV Small Kitchen Bar Sink, Handmade Stainless Steel Wet Bar Sink, Outdoor Single Bowl, Brushed Nickel Prep Sink with Strainer
$115.99
Shop Now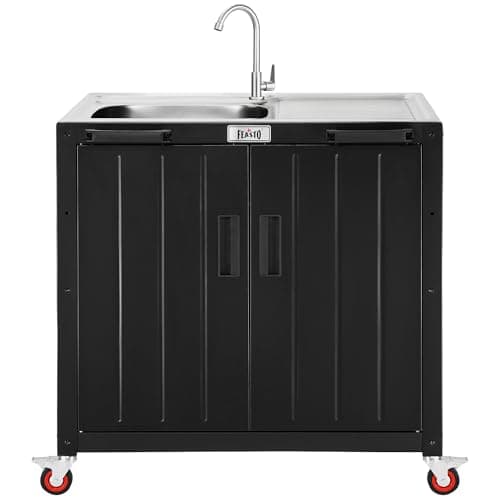
Feasto Outdoor Kitchen Island with Stainless Steel Sink and Storage Cabinet, 35-Inch BBQ Prep Station with Faucet & Lockable Wheels for Patio, Backyard, and Outdoor Cooking, Black & Silver
$329.00
Shop Now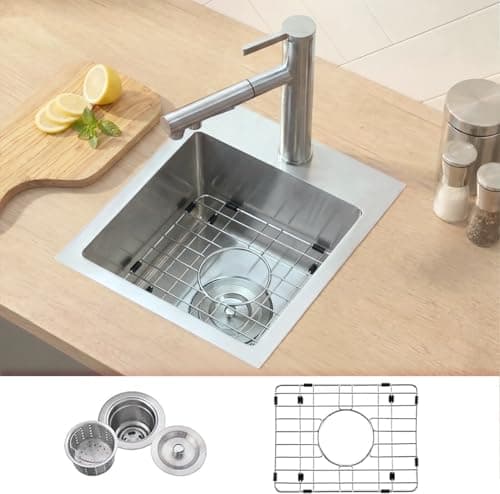
VCCUCINE Drop in Bar Sink, 15x15 Inch Topmount RV Small Kitchen Sink, Handmade Stainless Steel Wet Bar Sink, Outdoor Single Bowl, Brushed Nickel Prep Sink with Accessories
$84.99
Shop Now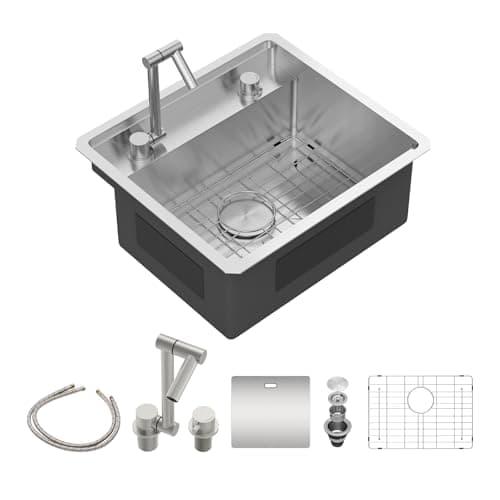
Sarlai Outdoor Sink, 21x19 Inch Undermount Kitchen Sink Workstation with Foldable Faucet Bar Prep Single Bowl 16 Gauge Stainless Steel Sinks with Cover,BBQ Sinks Outside with Cover
$259.00
Shop Now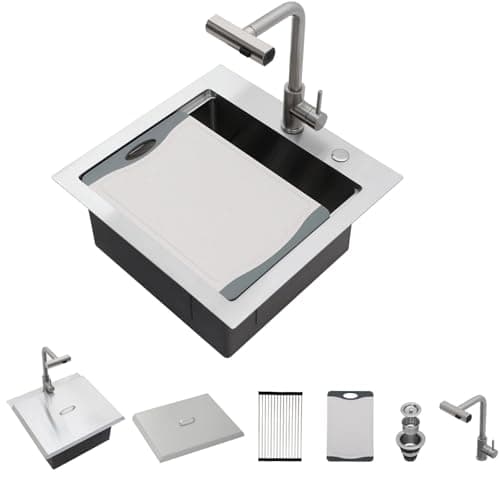
Lordear Drop In Outdoor Kitchen Sink Workstation with Pull-out Faucet 21" x 20" Bar Prep Sink 16 Gauge Stainless Steel Single Bowl Small Kitchen Camper Wet Bar Mobile Home RV Basin with Cover
$297.00
Shop Now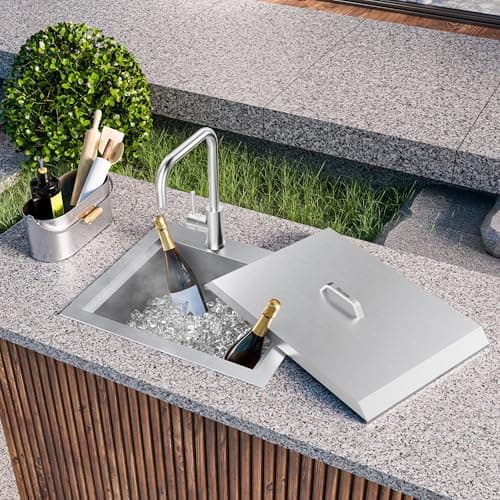
Outdoor Sink, TECASA 21 x 18 Inch Drop-in Workstation Kitchen Sink with Dust Lid and Faucet, T304 Stainless Steel Single Bowl Bar Basin with Cutting Board for Garage, RV, BBQ & Gardening
$294.99
Shop Now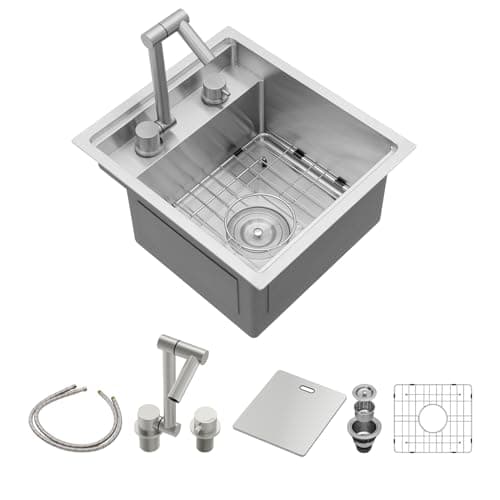
Sarlai Outdoor Sink, 15x17 Inch Undermount Kitchen Sink Workstation with Foldable Faucet Bar Prep Single Bowl Kitchen Sinks 16 Gauge Stainless Steel Sinks with Cover,BBQ Sink Outside
$229.00
Shop Now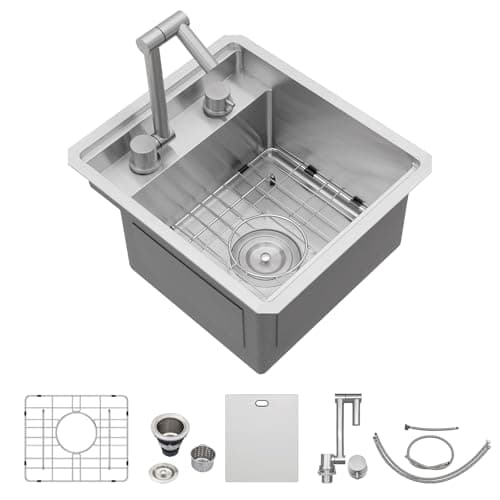
Couoko 15x17 Inch Outdoor Undermount RV Sink with Folding Faucet Workstation 16 Gauge Stainless Steel Single Bowl Handmade Concealed RV Wet Outdoor Bar Van Kitchen Sinks with Luxury Accessories
$219.99
Shop NowVCCUCINE 22x18 Inch Drop in Kitchen Sink,16 Gauge Topmount RV Small Kitchen Bar Sink, Handmade Stainless Steel Wet Bar Sink, Outdoor Single Bowl, Brushed Nickel Prep Sink with Strainer
$115.99
Shop NowFeasto Outdoor Kitchen Island with Stainless Steel Sink and Storage Cabinet, 35-Inch BBQ Prep Station with Faucet & Lockable Wheels for Patio, Backyard, and Outdoor Cooking, Black & Silver
$329.00
Shop NowVCCUCINE Drop in Bar Sink, 15x15 Inch Topmount RV Small Kitchen Sink, Handmade Stainless Steel Wet Bar Sink, Outdoor Single Bowl, Brushed Nickel Prep Sink with Accessories
$84.99
Shop NowSarlai Outdoor Sink, 21x19 Inch Undermount Kitchen Sink Workstation with Foldable Faucet Bar Prep Single Bowl 16 Gauge Stainless Steel Sinks with Cover,BBQ Sinks Outside with Cover
$259.00
Shop NowLordear Drop In Outdoor Kitchen Sink Workstation with Pull-out Faucet 21" x 20" Bar Prep Sink 16 Gauge Stainless Steel Single Bowl Small Kitchen Camper Wet Bar Mobile Home RV Basin with Cover
$297.00
Shop NowOutdoor Sink, TECASA 21 x 18 Inch Drop-in Workstation Kitchen Sink with Dust Lid and Faucet, T304 Stainless Steel Single Bowl Bar Basin with Cutting Board for Garage, RV, BBQ & Gardening
$294.99
Shop NowSarlai Outdoor Sink, 15x17 Inch Undermount Kitchen Sink Workstation with Foldable Faucet Bar Prep Single Bowl Kitchen Sinks 16 Gauge Stainless Steel Sinks with Cover,BBQ Sink Outside
$229.00
Shop NowCouoko 15x17 Inch Outdoor Undermount RV Sink with Folding Faucet Workstation 16 Gauge Stainless Steel Single Bowl Handmade Concealed RV Wet Outdoor Bar Van Kitchen Sinks with Luxury Accessories
$219.99
Shop NowTypes of Outdoor Kitchen Sinks: Drop-In, Undermount, and Bar Sinks
Outdoor kitchen sinks come in three primary mounting styles, each with distinct advantages depending on your island design and usage habits. Drop-in sinks, also called top-mount or self-rimming sinks, are the most popular choice for outdoor kitchens because they are the easiest to install. The sink has a visible rim or lip that sits on top of the countertop, and the basin drops down through a cutout in the counter surface. Installation requires only a properly sized hole and a bead of silicone caulk around the rim to create a waterproof seal. Drop-in sinks work with every countertop material, including tile, granite, and concrete, and they can be swapped out without disturbing the countertop. Models like the Elkay Crosstown 25-inch drop-in at $210 and the Ruvati Tirana 25-inch at $190 are popular choices specifically designed for outdoor use with T-304 stainless steel construction.
Undermount sinks attach to the underside of the countertop, creating a seamless transition from counter to sink that makes cleanup effortless because you can sweep debris directly from the counter into the basin. They look sleeker than drop-in models but require a solid-slab countertop like granite or concrete because the counter edge is exposed around the cutout. Installation is more involved, requiring clips, epoxy, and precise alignment, so most homeowners have their countertop fabricator handle the undermount installation. Bar sinks are compact single-basin sinks, typically 15 to 18 inches wide, designed for prep work and handwashing rather than heavy-duty dish cleaning. They are ideal for smaller outdoor kitchen islands where space is limited or as a secondary sink in a larger layout. A 15-inch bar sink requires a cutout of only about 13 by 15 inches, making it feasible to add a sink even to a six-foot island that already houses a grill. For a full overview of every component, layout option, and design path, see our complete outdoor kitchen setup guide.
Best Materials for Outdoor Kitchen Sinks
The material you choose for your outdoor kitchen sink determines its durability, maintenance requirements, and appearance over years of exposure to sun, rain, and temperature extremes. Stainless steel is the dominant material for outdoor kitchen sinks, and for good reason. It is lightweight, corrosion-resistant, easy to clean, and available in virtually every size and configuration. Look for sinks made from T-304 grade stainless steel, which contains 18 percent chromium and 8 percent nickel for superior rust resistance compared to lower grades like T-200. Gauge thickness matters: 16-gauge stainless (1.5mm thick) is noticeably more rigid and less prone to denting than 18-gauge (1.2mm), though 18-gauge is perfectly adequate for most outdoor kitchen uses. Top stainless steel outdoor sink options include the Ruvati Gravena 28-inch undermount in 16-gauge at $230 and the Kraus Standart PRO 30-inch undermount at $280.
Granite composite sinks, made from roughly 80 percent crushed granite and 20 percent acrylic resin, offer a premium look and exceptional durability outdoors. They resist scratches, stains, heat up to 535 degrees Fahrenheit, and UV fading. Brands like Blanco with their Silgranit line and Kraus with their Quarza series offer granite composite sinks specifically suited for outdoor use, priced from $250 to $500. Available in colors ranging from black and metallic gray to brown and white, granite composite sinks add a design element that plain stainless steel cannot match. Fireclay sinks offer a farmhouse aesthetic and are extremely durable, but they are heavy (60 to 100 pounds) and expensive ($500 to $1,200), making them a niche choice for outdoor kitchens with a rustic design theme. Copper sinks develop a living patina over time and have natural antimicrobial properties, but they require periodic waxing and will change color unpredictably outdoors, which is either a feature or a drawback depending on your taste.
Choosing the Right Size Outdoor Kitchen Sink
Sink size directly impacts how useful your outdoor kitchen sink will be for food prep, cleanup, and general utility. The right size depends on your island dimensions, how you plan to use the sink, and whether it is your only outdoor water source or a supplement to an indoor kitchen. Small bar sinks measuring 15 by 15 inches to 18 by 16 inches are best suited for handwashing, rinsing fruit, and filling small pots. They fit into tight spaces and are the go-to choice when you want to add a sink to an island without sacrificing significant counter space. A bar sink is also the right call for a secondary prep station in a larger outdoor kitchen that already has a main sink elsewhere.
Medium single-basin sinks in the 22-inch to 28-inch range are the most versatile size for outdoor kitchens. They are large enough to wash a standard baking sheet, a cutting board, or a stack of plates, while still leaving reasonable counter space in an eight-foot island. A 25-inch single basin at 10 inches deep is the sweet spot that most outdoor kitchen designers recommend as the primary sink. Large workstation sinks measuring 30 to 33 inches wide come with accessories like sliding cutting boards, colanders, and drying racks that rest on built-in ledges inside the basin. The Ruvati Roma 30-inch Workstation Sink at $320 and the Kraus Kore 33-inch Workstation at $370 are popular models that turn the sink into a multi-function prep area. Before committing to a size, verify that your island countertop has enough depth. A 10-inch-deep sink basin requires a countertop with at least 24 inches of front-to-back depth, and the cutout must clear any structural framing inside the island by at least two inches on each side.
Outdoor Kitchen Faucets: What Pairs Best With Your Sink
Your outdoor kitchen faucet must withstand the same weather exposure as the sink, so choosing a model specifically rated for outdoor use is essential. Standard indoor faucets use finishes and internal components that degrade when exposed to UV radiation, rain, and freezing temperatures. Stainless steel faucets are the best all-around choice for outdoor kitchens because the material is inherently corrosion-resistant and does not rely on a plated finish that can peel or flake. The Delta Trinsic 9159-AR-DST in Arctic Stainless at around $300 and the Moen Align 5923SRS in Spot Resist Stainless at around $350 are popular outdoor-rated pulldown faucets with single-handle operation, which is important when your hands are messy from cooking.
A pulldown or pullout sprayer is nearly essential for an outdoor kitchen faucet because it lets you direct water flow for rinsing large items, filling pots placed on the counter, and hosing down the sink basin after use. Fixed spout faucets are less versatile and harder to use for heavy-duty cleaning. Consider faucet height as well: a high-arc faucet with 10 to 12 inches of clearance above the sink rim accommodates tall pots and large platters. If your outdoor kitchen is not connected to a hot water supply, this is less of a concern, but if you do run a hot water line or install a point-of-use water heater, choose a faucet with both hot and cold handles or a single-handle mixer. For truly all-weather durability, look for faucets with ceramic disc valves rather than rubber washers, as ceramic discs maintain a drip-free seal for years even with temperature fluctuations and intermittent use.
Plumbing Requirements for an Outdoor Kitchen Sink
Adding a sink to your outdoor kitchen requires running a water supply line and a drain line from your home's existing plumbing to the island location. The complexity and cost of this work depend primarily on the distance between your outdoor kitchen and your home's plumbing system and whether you want hot water in addition to cold. A cold-water-only setup is the simplest and most common approach. It involves tapping into an existing outdoor hose bib or running a new 1/2-inch copper or PEX supply line from the nearest interior cold water pipe to the outdoor kitchen, typically through a crawl space, basement, or exterior wall. For runs under 30 feet, expect to pay a licensed plumber $400 to $1,000 for labor and materials.
If you want hot water at your outdoor sink, you have two options. Running a separate hot water supply line from your home's water heater is the most reliable method but adds $300 to $800 in additional plumbing costs due to the second line. A more cost-effective alternative is installing a point-of-use tankless water heater under the outdoor kitchen counter. Electric models like the Bosch Tronic 3000 (3.4kW, around $200) or the EcoSmart ECO 11 (13kW, around $270) heat water on demand and mount inside the island cabinet. They require a dedicated 240-volt electrical circuit, which an electrician can install for $200 to $500. The drain line is equally important. A standard 1-1/2-inch or 2-inch PVC drain line must run from the sink's P-trap to either your home's sewer system, a dry well, or a French drain, depending on local codes. The drain line needs a minimum slope of 1/4 inch per foot to ensure proper flow. In areas with freezing winters, all outdoor supply and drain lines should include shutoff valves and drain-down capability to prevent burst pipes.
Drainage Solutions for Outdoor Kitchen Sinks
Drainage is often the trickiest part of an outdoor kitchen sink installation because connecting to an existing sewer line may involve long runs, trenching, or navigating around hardscape features. The ideal solution is a direct connection to your home's sewer or septic system via a properly sloped PVC drain line. This handles all wastewater, including food particles and grease, through the same system your indoor plumbing uses. A direct connection is required by code in most municipalities for any outdoor sink that will be used for food preparation, and it ensures proper sanitation and environmental compliance.
When a direct sewer connection is impractical due to distance or site constraints, several alternative drainage methods exist. A dry well is an underground pit filled with gravel that collects gray water and allows it to percolate into the surrounding soil. Dry wells work for outdoor kitchen sinks that primarily handle clean rinse water, but they are not suitable for heavy grease or food waste and may not be code-compliant in all areas. A French drain is a perforated pipe buried in a gravel trench that disperses water over a larger area. Both dry wells and French drains should incorporate a grease trap to prevent fats and oils from clogging the drainage aggregate. The simplest temporary solution is a bucket drain, where the sink drain line terminates in a removable five-gallon bucket under the island that you empty manually. While far from glamorous, a bucket drain lets you have a functional outdoor kitchen sink without any underground plumbing, and it is code-compliant in many jurisdictions for residential non-commercial use. Whichever drainage method you choose, always include a P-trap in the drain line to prevent sewer gases from rising through the sink drain.
Installing an Outdoor Kitchen Sink: Step-by-Step Overview
Installing an outdoor kitchen sink is a project that a confident DIYer can tackle over a weekend, assuming the plumbing rough-in is already complete. Here is a step-by-step overview of the process for a drop-in sink installation, the most common type in outdoor kitchens. Step one: Mark the countertop cutout using the template provided with your sink. Most sinks include a cardboard or paper template that you tape to the counter surface and trace with a marker. If no template is included, flip the sink upside down on the counter, trace around the rim, then draw a second line 3/8 inch inside the traced line to account for the rim overlap.
Step two: Cut the opening using a jigsaw with a diamond or carbide blade for granite and tile, or a standard bi-metal blade for cement board. Drill a 3/8-inch starter hole inside the traced line to insert the jigsaw blade, then follow the line slowly and steadily. Support the cutout piece from below as you near the end of the cut to prevent it from breaking away and damaging the countertop. Step three: Dry-fit the sink into the cutout to verify the opening size and ensure the rim sits flush on the countertop. Step four: Apply a continuous bead of 100-percent silicone caulk around the underside of the sink rim, then lower the sink into the cutout and press down firmly. For undermount sinks, the process involves applying epoxy and tightening mounting clips from below. Step five: Connect the faucet supply lines to the shutoff valves using braided stainless steel connectors, and connect the drain assembly including the basket strainer, tailpiece, P-trap, and drain line. Step six: Turn on the water, check every connection for leaks, and caulk any gap between the sink rim and countertop from above for a watertight seal. The entire installation typically takes three to five hours for a drop-in sink, or five to eight hours for an undermount installation.
Winterizing and Maintaining Your Outdoor Kitchen Sink
Proper maintenance extends the life of your outdoor kitchen sink, faucet, and plumbing for decades, while neglecting seasonal care can lead to cracked pipes, corroded fixtures, and costly repairs. Routine cleaning for stainless steel sinks involves washing with warm water and dish soap after each use, then drying with a soft cloth to prevent water spots. For stubborn stains or discoloration, a paste of baking soda and water applied with a non-abrasive sponge restores the finish without scratching. Granite composite sinks should be cleaned with a gentle all-purpose cleaner and occasionally treated with mineral oil to maintain their rich color. Avoid bleach and harsh chemical cleaners on both materials, as they can damage the finish over time.
Winterizing is critical if you live in a climate where temperatures drop below 32 degrees Fahrenheit. The process involves shutting off the water supply to the outdoor kitchen at the interior shutoff valve, then opening the outdoor faucet to drain any remaining water from the supply lines. Disconnect any flexible supply hoses under the sink and allow them to drain. Remove the P-trap and empty it, as standing water in the trap will freeze and crack the fitting. If your plumbing includes a point-of-use water heater, drain it according to the manufacturer's instructions. Some homeowners blow compressed air through the supply lines using an air compressor set to 50 PSI to ensure no residual water remains. For the sink basin itself, a fitted cover or an inverted trash bag secured with tape keeps leaves, snow, and debris out of the drain opening during the off-season. In spring, reverse the process: reconnect the P-trap, turn on the water supply, check all connections for leaks, and run both hot and cold water for several minutes to flush the lines before using the sink for food preparation.